|
As we gradually transition from hobby-sized farm into one that produces enough surplus to sell, I have the need for more shelter without wanting to invest permanently in something we'll outgrow in just a year. Hoop tents purchased online that provide shelter over an 12' x 24' space would cost me a couple of thousand dollars each for a cheap one. After the initial year of use, I don't foresee a use that justifies that expense. These hoop tents cost about 10% of that and can be used for livestock shelter or simple greenhouses. 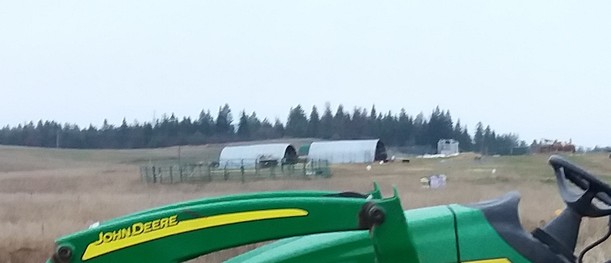 Here are my two hoop tents (in the background of another picture, so the resolution is unfortunately poor). They measure 8-feet wide by almost 24-feet long. Opened at both ends, but provide good shelter from wind, rain, and snow as well as shade on hot sunny days. November 2016. Here are my two hoop tents (in the background of another picture, so the resolution is unfortunately poor). They measure 8-feet wide by almost 24-feet long. Opened at both ends, but provide good shelter from wind, rain, and snow as well as shade on hot sunny days. November 2016. I set out to make my own and decided on PVC pipe because it's something I can work with on my own and it's inexpensive. The problem, however, is that it would break in our first windstorm. We have snowy winters, gusty winds, and a January thaw that usually results in really heavy wet snows as everything freezes up again. PVC just can't handle that, but I have two hoop shelters successfully providing reprieve from the weather for my sheep and goats.
The key is to add rebar to the hoop ribs of PVC. I would also recommend in the lengthwise pieces especially in the base pieces. I did not include instructions for any lengthwise pieces, and I would suggest testing out if there is space for them to pass each other in the crosses. Here is how I made the hoop tents. The finished tent has a footprint of about 12' x 24', opened at both ends, with a tarp that goes all the way down to the ground on the long sides. There are thirteen hoops total with five pieces running longwise, two of which rest on the ground. If not used by rough animals, this tent may last for several years, especially if you replace the tarp. Materials List: (1) 20' x 24' heavy duty tarp (the finished measurements are slightly less) (38) 10' 3/4" PVC pipe (33) 3/4" PVC crosses (28) 3/4" PVC tees (4) 3/4" PVC 90-degree corners (13) pcs 20' long rebar (#5 or #6 - could do #4, probably, if you wanted) PVC primer & cement Twine or rope (baling twine is perfect) (26) Stakes (I have a bender, so we use rebar bent like candy canes) (1) Roll of ducts tape, all-weather is best, but not necessary * Make sure all PVC connectors of the same type are the same length as there is variation among stores and brands. I recommend having a few extras of each on hand as well as a few couplers in case you make a mistake. Cut List: (52) 58" lengths of PVC for the sections of the hoops (55) 22.75" lengths of PVC to connect the hoops (runs between hoops) (10) 13" lengths of PVC to connect the end hoops to the rest of the tent (13) pcs Rebar (#5 or #6) cut to 19' 6" Assembly: 1) Assemble (11) hoops by connecting four 58" pieces into a row with three crosses. Make sure all of the crosses are laying flat in the same direction. 2) Assemble (2) end hoops with three tees (instead of crosses) and four 58" pieces. Make sure all of the tees are laying flat in the same direction. Put the 90-degree corners on the ends of these pieces, also facing the same direction as the tees. Glue a 13" later piece into each tee and each corner. There should be five lateral pieces sticking out from the side in the same direction. 3) Assemble the two long pieces that will attach to the ends of the hoops and be staked to the ground. Each one has (10) 22.75 lengths and (11) tees. Make sure all of the tees are lying flat in the same direction. These two pieces would benefit from rebar inserted as they take a lot of strain from curving the hoop sections of the tent. A 20' length is probably adequate because it will pass through all the tees and shouldn't interfere with other rebar. 4) Measure and stake down the long pieces assembled in step #3. Make sure the ends line up and are 12' apart. Stake a little loose so there is about 1-2" slack under these long pieces to allow for tying the tarp down later. 5) Prep ten (not all eleven) of the hoops for assembly by putting in cross pieces. For each hoop piece, put in three 22.75" pieces along one side of the tees (perpendicular to the hoop pieces). Only put in one side leaving the other side open. 6) Connect the plain hoop piece (the one without any 22.75" pieces added) into one that had does have the 22.75" to make a sort of ladder-looking piece with two hoops with three pieces connecting them. 7) Begin assembling the hoop tent. Slide a 19'6" piece of rebar into each of the two hoops that make up the ladder-like assembly from step #6. Glue one end of both hoops into the first two tees on one of the to long-wise pieces staked to the ground. Let it cure for a few minutes. 8) This next step I find the trickiest. You need to glue the other end of the hoops, bend them and set the pieces into the two end tees on the other long base piece. The hoops will stand up, but with the rebar, they can offer some resistance. 9) Add the next ten ribs that have the three 22.75" pieces glued to them. Started by dry fitting one end of the hoop, bending it and dry fitting the other end. Then I can turn it and glue the top lateral piece. This ensures it is turned the right way but leaves me the maximum flexibility when going back to glue the bottoms and other two later pieces. 10) The two end pieces hold the tarp. This part I would recommend doing on a day that is not windy. Spread the tarp out. Lay the outer side down if it matters. Lay the two end pieces on the 20' long sides of the tarp. Center it along the side. 11) Just inside the folded edge of the tarp, cut three holes that corresponds to the threes in the end hoops. With the end hoops laying with the later pieces pointing out towards the edge of the tarp, lift the edge of the tarp a little and insert the lateral pieces. This will make the tarp wrap around the end hoops - they are very strong. 12) Straighten the tarp along the end tarp and tape it with the duct tape keeping it tight and straight. When done taping, roll the end hoop lateral pieces so they face towards the center of the tarp. This is how they will sit when they are attached to the tent. Repeat on the other side. 13) I like to glue in the middle piece first to the middle cross of one of the erected hoop pieces. Position the tarp wherever is most convenient for you. Glue in the other two lateral pieces and finally the bottom pieces. 14) Lift the tarp over the hoop frame, taking the other end piece to the other end of the tent. Ensuring the tarp is wrapping correctly, glue the center top lateral piece into place. It will be a tight fit and tension should hold it in place well. Glue the other lateral pieces into place. If it is breezy at all, put up the end pieces so that the breeze is blowing to help you get the tarp across the tent. Very much wind makes this very difficult. 15) Take your rope or twine and wrap through the tarp grommets and around the lateral base pieces that are staked to the ground. Make this as tight as you can as the tarp will relax a little bit. Repeat on the other side. Pound the stakes into the ground until tight. I have made two hoop tents and tried building the frame fully one time, but that was very difficult to get all hoop pieces to bend the right way and get into place. I have put fence along the sides because goats and kids are very inclined to jump off the sides. They still try. The tents have been worn by animals rubbing on the insides and a horned buck rubbing on the ends. A little fence or such should help protect the tent to help it last longer.
0 Comments
Your comment will be posted after it is approved.
Leave a Reply. |
Mindy HelmsWife to Brandon, mother to Tess and Liam, farmer, entrepreneur, cook & baker, nurse, and accountant who loves to try new things, travel, and work toward greater self-reliance. Archives
May 2024
Categories
All
|
 RSS Feed
Copyright Arcadia, Inc. 2017-2024
PO Box 277, Harrison, Idaho USA
PO Box 277, Harrison, Idaho USA